How To Create Validation List In Excel For Mac
Adobe Acrobat Reader 19.010.20064 - View PDF documents. Download the latest versions of the best Mac apps at safe and trusted MacUpdate. OS X 10.5.8 or later. About Adobe Reader for Mac. Adobe Acrobat was the first software to support Adobe Systems' Portable Document Format (PDF). It is a family of software, some commercial and some free of charge. Adobe Reader (formerly called Acrobat Reader) is available as a no-charge download from Adobe's. Adobe Reader 11.0.23 for Mac is free to download from our application library. The following versions: 11.0, 10.1 and 9.4 are the most frequently downloaded ones by the The actual developer of this free software for Mac is Adobe Systems Inc. You can set up Adobe Reader on Mac OS X 10.4.3 or later. Download Lion for Mac OS X Lion 10.7 has now been superseded by OS X 10.8 Mountain The 10.7.5 update is recommended for all OS X Lion users and includes general Advertisement. Articles about free adobe reader mac os x 10.5.8. How to Install Adobe Photoshop CS5 Full Version. Mac os x 10.5 amazon. Company: Adobe Systems. Total Downloads: 10,395. Contributed by: sridherreddy. Rating: 0 of 5 Rate It! Tested: Free from spyware, adware and viruses. Adobe Reader 8.0 (PPC) Change Log.
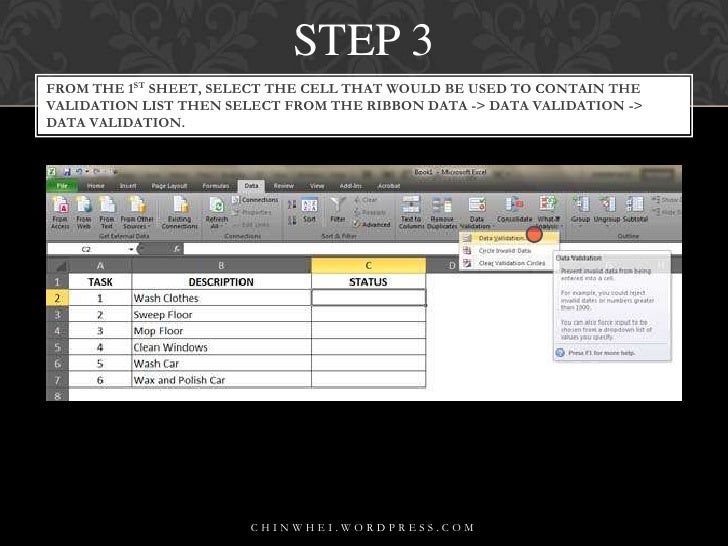
Download our examples • Select the cell(s) you want to create a rule for. • Select Data >Data Validation.
Now we can use our list to create a dropdown menu with those values. First select the cell where you want your dropdown list to be created. This can be on the same sheet or on a differnet sheet. I went ahead and selected cell A1 on Sheet2 for the example. Next, go to the top menu and choose Data and then Validation.
• On the Settings tab, under Allow, select an option: • Whole Number - to restrict the cell to accept only whole numbers. • Decimal - to restrict the cell to accept only decimal numbers. • List - to pick data from the drop-down list. • Date - to restrict the cell to accept only date. • Time - to restrict the cell to accept only time. • Text Length - to restrict the length of the text. • Custom – for custom formula.
• Under Data, select a condition: • between • not between • equal to • not equal to • greater than • less than • greater than or equal to • less than or equal to • On the Settings tab, under Allow, select an option: • Set the other required values, based on what you chose for Allow and Data. For example, if you select between, then select the Minimum: and Maximum: values for the cell(s). • Select the Ignore blank checkbox if you want to ignore blank spaces.
• If you want to add a Title and message for your rule, select the Input Message tab, and then type a title and input message. • Select the Show input message when cell is selected checkbox to display the message when the user selects or hovers over the selected cell(s). Now, if the user tries to enter a value that is not valid, a pop-up appears with the message, “This value doesn’t match the data validation restrictions for this cell.”.
Note: The boxes where you enter limiting values will be labeled based on the data and limiting criteria that you have chosen. For example, if you choose Date as your data type, you will be able to enter limiting values in minimum and maximum value boxes labeled Start Date and End Date. Prompt users for valid entries When users click in a cell that has data entry requirements, you can display a message that explains what data is valid.
• Select the cells where you want to prompt users for valid data entries. • On the Data tab, click Data Validation > Data Validation. Note: If the validation command is unavailable, the sheet might be protected or the workbook might be shared.
You cannot change data validation settings if your workbook is shared or your sheet is protected. For more information about workbook protection, see. • On the Input Message tab, select the Show input message when cell is selected check box.
• In the Title box, type a title for your message. • In the Input message box, type the message that you want to display. Display an error message when invalid data is entered If you have data restrictions in place and a user enters invalid data into a cell, you can display a message that explains the error. • Select the cells where you want to display your error message. • On the Data tab, click Data Validation > Data Validation.
Note: If the validation command is unavailable, the sheet might be protected or the workbook might be shared. You cannot change data validation settings if your workbook is shared or your sheet is protected. For more information about workbook protection, see. • On the Error Alert tab, in the Title box, type a title for your message.